
Ornaments 2016

Decided to flex the Xcarve muscle and make some custom ornaments for family members ( my grandmother used to give us ornaments every year and those are the ones that were used to decorate my own tree in my adult life, so I figured I would carry that tradition on to my nieces and nephews ) and since I have Vcarve and a Xcarve I figured it was only fitting that I design, manufacture, and paint them myself.

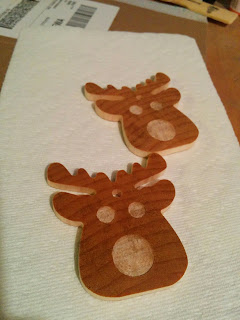
Started by finding a fair use, free template pattern of a reindeer I liked and then imported it into Vcarve and resized for my 3 x 3, wooden stock, and modified some of the features of the import to be better for cutting, replaced imported circles with real ones drawn in Vcarve so they would be smoother. Added a ribbon hole feature and generated some code.

Cut Stock pieces about 4mm thick 

Poly stock with a nice brown and let dry


Clamp and Run Gcode, run time was 7 minutes, as it was a small end mill for the fine detail


Paint, dry, and insert ribbon


Did two sided machining on a few for peoples initials


I think everyone liked them and it was a bit different then just getting an ornament and writing the year on it for them, now to think of more designs for next year!

I also made a few for people that were just bare wood, with their children's initials in the back so they could paint their own.


Comments

Popular posts from this blog

X-Carving 3D STLs

Reading around on the inventables forums, I found a post about a new web based CAM generator from STLs, it also does other functions FDM and LASER, called kiri moto . For a web based CAM generator it does a good job, it is a work in progress and has been updated with new features already. Read the thread above for all that has happened in the past month. As for my project, I had some STL files for things I have 3D printed in the past, so I sliced and processed some code from kiri:moto. You can manage your tools and Post Processors in the web page and post code quickly. The videos and instructions are good to start but the results are the true test. Overall I am very happy with how it cut, I started in foam just so I could not worry about stray code and as it is not a simulator, like some other CAM software. It made good code for a free web based CAM generator and I look forward to the new additions as the developer continues improving this tool.  At this time I am eva

X-Carve calibration

I followed these steps: for the X and Y using the same shinwa machinist rule  and an engraving bit: I used a dial indicator to calibrate my Z axis as in this video I then calculated the change from the measured vs actual that I came up with from the initial setup and changed my settings in Mach4. I have not had to re-calibrate since I originally setup my X-Carve but I have also not pushed it too hard as of this point.

My X-Carve first project

Well not my first ( I used the 2d drawings from inventables for the clamps to make a couple of clamps) but the most in-depth and coolest one to date. I designed a hat and mitten rack for a friends children in SolidWorks, it provides 10 hangers per child for gloves, mittens, boots, or hats. It was designed around the constraints that it must all be machined from one 31" x 31" piece of wood. This includes the two halves and the base or feet. The two halves interlock to form what looks like a tree and that allows it to be small while having plenty of space for all of the drying needs of two small children. V Carve Pro 7.0 is used for creating the code for my x carve to run in Mach4 I spaced out all the pieces in Solid Works by 7.5 mm to insure a 1/4 end mill could pass between all the parts without nicking and damaging any of the parts. I then used 1/4  Yonico end mill at 30ipm with a step down of 1.0 mm and a 40% step over to profile all of the pieces. I also used th